Wednesday, April 27, 2011

Edible Finger Paint

Painting with toddlers is so exciting. By that I mean:
There is nothing calm about it!

It is fast, furious and the clean up is just the same!

But they LOVE it! So, I love it!

Throw in a friend (or a sibling, if you have one) and it adds a whole new dimension of learning!

Here is what we started with.

Get your pen out. This recipe is LONG:

Plain yogurt.
1 drop of food coloring.
Repeat for more colors.
That is all.

Dressed Undressed and ready to go!

Let the good times roll!

Carter's buddy was really into this!
He totally led the way!

Collaborative Art: Working as a team, toward a common goal of self expression.
They sure did that! All over the table, patio, patio furniture and of course...themselves!

It was a fabulous day!

Thanks for playing Trevor and Cat!
Side note: Trevor is the other China-born-Texan in our building! That's right, there are two!

Monday, April 25, 2011

Teaching Blog Addicts

Big news:

We've just joined the ranks of writing for the website: Teaching Blog Addict. And we can't be more excited!

This new blog is amazing for all teachers at home or in the classroom! It should come with a warning though:

BEWARE: If you start and can't stop...you may be an addict.

There are so many tools you learn as a teacher that help you in parenting too. Take a peek at this blog to get an idea of what teachers talk about and "tools" they use to help with teaching techniques, specific skills, relationships, classroom management (aka: keeping your class running as smooth as possible...great for at home too!)

Check it out and follow along!!

Well here goes nothing:

I'm Sarah, and I'm a Teaching Blog Addict.

(Whew, I feel much better now!)

Monday, April 18, 2011

Swimming Lessons... In the tub!

Not too many people know this about me, but the reason I became a teacher was from teaching swim lessons every summer as a teenager. I loved working with children and teaching them a skill they would use all of their life. (Kind of like reading!)
I got hooked and knew there was no going back.
I have taught lessons every summer since I was 17! ( However, I did take the summer of 2007 off to get married!) I even taught lessons 8 months pregnant with TWINS! My poor students would get kicked by a baby and think I was really mean!

So, here are some really easy things you can be doing with your child in the tub to get ready for that first swim lesson!  Some of these are great to start when you move to the big tub, and some of these skills are for 12-24 months.

  • Pour the water on their head!  Don't be easy on them and have them lean back. You are not doing them any favors! This is very similar to the feeling of going under water and coming back up for air! (I hate to call it dunking, but that is pretty much the action.)  
    • Tips while doing this:
      • Tell your child what you are about to do! "Okay, now we are going to get your hair wet.
      • Count the number of times you rinse. "One, two, three. Okay done!"
    He still lets us do this! But now we warn him it is coming!
  • Let your child lay down on their back during the bath! Ears under water and everything! This takes some practice. Gently lay them down, and hold the back of their head, making sure the water in the tub is not too high.  Eventually after daily practice, they will start to do this on their own when asked.
    • This will help with floating on their back.  The more comfortable they are in the tub, the easier the transition to the pool will be.  (Floating is THE most important skill children under 2 years old can learn. It will save their life.)
  • Encourage your child to put their face in the water!  This will take some work on your part. Children learn by watching. I would lean all the way over the tub and stick my own face in the water to show them.  I use the term, "Kiss the water". Then whenever one child would do it, we would cheer and make a big 'to do' about the whole thing. Then they kept on doing it over and over and eventually for longer periods of time. They even cheer for themselves now!

  • Blowing Bubbles is the next step!  Once again, you need to get your own face in the tub and show your child what you want them to do. Tell them to blow bubbles, practice out of the water, then in the water. Make it a game!

  • And the last step we are working on in the tub: ARMS!  I have lots of terms to use depending on what works for your child.  (Think underwater arms, or breast stroke arms)
    • "Push the cookies away." If they like Cookie Monster, tell them that the cookies are all getting wet and you need to get them out of the tub! So, reach for the plate of cookies then push them away.
    • "Make a rocket ship, then blast off!"
    • "Push the water." "Make a wave"
      • Practice this one outside of the tub. Lay on the carpet, on your tummies, and everyone practice. Then when in the tub, remind them about their arms! So far, only Luke can do this, and I don't have any pictures or video yet!
(Please don't forget to watch your child the entire time they are in the bath.)

This post is getting kinda long, I will come back another time and tell you some of my favorite products for the pool this summer!

Thursday, April 14, 2011

Kids Crafts: Bunny Painting!

Let the count down begin!
I love holidays. ALL.OF.THEM.
I think the 'bulletin board display making' side of me is always dying to come out.

So when my friend, Allison, asked me to come over to paint today, I said YES!


Supplies:
Paint, Wiggle eyes, card stock, cotton balls, sharpie.

  • When you put the paint on your child's hand, press it down onto the paper with their fingers spread apart to form the bunny ears!
  • Add eyes, cut pink paper for the ears, and throw a cotton ball on the thumb! Use the sharpie to add the final touches and you are done!


It turned out cuter than I anticipated!!
Just try to refrain your excitement and not go wake up your child to do this craft right now!

And do a little bunny hop while you are waiting for your turn!

Egg Cooking Tips:
From Martha Stewart herself: (I do this every time and they peel super easy!)

Directions

  1. Place eggs in a large saucepan. Cover them with cool water by 1 inch. Slowly bring water to a boil over medium heat; when the water has reached a boil, cover and remove from heat. Let sit 12 minutes.
  2. Transfer eggs to a colander; place under cool running water to stop the cooking. Eggs can be peeled and served immediately. Remaining eggs, with shells on, may be refrigerated in an airtight container for up to 3 days.


Some cute ideas I've found for dying eggs:
Dinosaur Eggs from Our Best Bites:


Wax Resist Eggs from Martha Stewart:


And for those of you who want to dye eggs, but don't want the really little ones eating food coloring or chemicals. Directions found here!:


Wednesday, April 13, 2011

Flower Pot Stepping Stones

Last Saturday night, while having dinner at a friend's home, Carter's new found need to push his growing muscles to extremes lead him to wander into their kitchen, and peer up over the counter at the adults sitting at the dinner table. To glance over and see his little face over the counter was not only shocking, it was frightening!

How was this physically possible?

While in a panic, I ran to his side of the bar to notice he had conquered a step stool!

Isn't it shocking the first time you see them do some new physical feat!?

Well, a few days later, while shopping at our grocery store, the "Dollar" aisle was promoting colorful flower pots for spring time!


I thought, if I could just use these as stools it would be a wonderful way to build upon his new need to climb. (With supervision, of course!) So I bought 4, in blue and green, so that we can also chant the patterned colors.

He was very proud!

Victory Dance!
(Notice there is a random block and cracker in his hands.)


As you all know...their own idea is always their favorite though.
He discovered that they are great for stacking,
so this is what he uses them for most of the time!

Happy Climbing!

P.S. We've started a Teacher at Heart Facebook Page. We'd be flattered if you "liked" us!

P.S. Part 2: If you could, we'd love it if you clicked the follow along button to your right or added us to your Blog List! Thank you!


Monday, April 11, 2011

One-to-One Correspondence

Great book for this lesson!

If your child is already in preschool or has started kindergarden, then chance are, you have heard the term "one-to-one correspondence" before. Maybe it's been listed on their Skills Accomplished list or Report Card.

It is usually explained as the ability to match one object to one (corresponding) number or object.

Example: 1 egg per egg carton holder. 12 total.
or
Example: 2 socks to 2 shoes.

This concept is so fundamental that we often don't even think about it. Most people want to jump right into teaching their kiddos to count 1-10. While Rote learning (memorizing counting numbers) is a handy tool, it can just be like singing a song and have no meaning to them. In order to lay a strong foundation for mathematic understanding they need to fully understand the meaning behind each of those little ol' numbers!

Children (all people really) learn best by using concrete examples, hands-on and FUN learning!

There are so so many ways to practice this concept for all developmental levels and can be as simple as:
  • Count your fingers and toes (touching each of them).
  • Count all of the animals in a book.
  • Covering the numbers 1-5 with the corresponding amount of stickers.
  • Counting the trees or cars you pass on a walk!
Teacher Tip- 3 techniques to help teaching this concept:
  1. Scanning- Have your child move their hand over the object as you count out loud. Better yet...touch it!
  2. Organize- If the items are scattered about you can move them together. Once counted, you can move them into a line or in an organized shape. Your child can then go back if they lose track, reorganize their thoughts, and pick back up.
  3. Partition- Assign separate "compartments" for all objects, counted and not yet! Like egg cartons, cups, baskets, paper cut into different shapes labeled with a number.
Do NOT let this explanation scare you. Most likely you are already doing these things and you hadn't even thought about it! See you are a teacher!

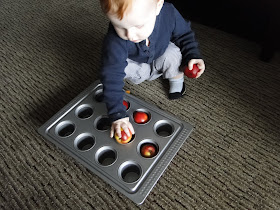
Here is an example of us playing (and secretly practicing 1-to-1 correspondence yesterday).

See that isn't scary!

And do not let these two pictures fool you. This lasted all of about 3 minutes!

There are so many ways to practice this! Here are some from a quick google image search:


What other ways do you practice this concept? Please share!


Saturday, April 9, 2011

Sunday Blog Hop

I hope you are enjoying your weekend! We are having great weather here in China and we are definatley taking advantage of being outside!

Hop around to these posts for some great child-centered fun ideas:


She shares a great (and inexpensive) way for some indoor gross motor fun!

............


Quirky Momma shares some creative and YUMMY exploration.


..............

Finally, a great read.


I love blogs like this. They get deeper into theories and great practices for parenting and relationships in general.


..........

Enjoy! Happy Weekend!

Thursday, April 7, 2011

Turn Off Your Cell Phone? Give it a try!

I'm sorry I have been MIA on this blog lately, lots going on over here! Thanks Sarah, Suzy and the guest bloggers for picking up the slack for me.

I was recently walking on the bike paths of near my home and was struck by the number of parents who are pushing strollers and engaged in conversation on their cell phones. I have almost become immune to it until several days ago, I actually saw a Mom pushing a stroller and engaging in conversation with her toddler. I wanted to run up and give her a hug.

Why are we all so busy that we seem to think that our conversation on the cell phones is more important than engaging in conversation with our children and teaching them about their surroundings? Why do we choose cell phone conversation over eye contact with our children?

All parents want to provide their child the best possible education. Many people think of early childhood education as the function of preschool. Yes, a school setting can introduce and encourage social skills, but going for a walk with your child can be another kind of learning experience. You might just be trying to get exerecise or fresh air, but your child is taking in the environment with all of her senses. Your child is seeing, hearing, feeling and smelling all of it and much more. Your child is aware! She needs someone to give these items names and validate her experience. It may be tempting to use the walk with your chld as a time to catch up on phone calls and take care of some business, but next time, try turning off your phone and focusing on your child. Point out the sights, sounds and smells in your surrounds and in a simple way, explain what they mean. Add the sense of touch by slowing down enough to allow him to touch a flower or leaf, or if she can walk, let him out of the stroller to touch the "touchables". To a young child the world is magical and fascinating. Even the most mundane elements are exciting!

This also applies to your time in the car, as well. Besides the safety issues, there is a wealth of learning to be done in the car. Car seats place the young child high enough to see out of the window. Imagine what your child thinks when a tractor trailer or a garbage truck rolls by. There are so many things to see such as, traffic lights, fire trucks, ambulances and police cars. Time in the car is is a good time to sing songs together or just listen to your favorite tunes. Consider this a bonus of time that you can spend with your chld.

What is the benefit of turning off your cell phone and focusing on your chld?

The result of positive, sharing, parent-child communication is the strengthening of the relationship. Your child will know that she is important to you. This provides her security and self-reliance. You are also performing the act of teaching. You are the window to her world. As you introduce, describe and explain her world, you are enriching her life. You are your child's first and most important teacher. The memories you create with your child are worth far more than the phone call you might miss. Enjoy your child and make wonderful memories!

Wednesday, April 6, 2011

Guest Blogger: Pudding Painting

I have another friend, Tara, who I think is Super Mom! She has 3, no, THREE boys. Ben is 3, almost 4. Parker is 2, and Evan is almost 5 months old.  She does a ton of fun stuff with her boys and they are so polite and well behaved.  We have been friends since 3rd grade. I just love friends like that, they are so special!

Short and Sweet:
Some days you just have to play inside, and here is a fun activity!

Supplies:  package of prepared pudding, 2 bowls, paintbrushes and spatulas

Rules:  Keep it in tub area as much as possible.
AND
Don't make your brother cry!

I think the best part about doing activities like this, is making memories.  You may be cleaning the tub for a while after, but pictures like this are priceless.
Here is the original post!

Tuesday, April 5, 2011

Easter Egg Shakers

It feels like I haven't posted in forever!
Here is a little something for fun and a cookie recipe that really tells the meaning of Easter!

Egg Shakers:
Plastic Eggs
Hot Glue
Dried Pasta, rice, large sprinkles, dried beans, small screws, etc.


The boys loved shaking the eggs and hearing the different sounds! However, I used Tacky glue, and my kids ripped them open and mess when everywhere. So I think you should use hot glue or super glue to really glue these shut.  And parent supervision is a must, just in case they do break open!

Speaking of parent supervision...
A bunch of our friends are having their second babies!!
And I learned a great tip in college. Teach the older children what toys are safe to come out and be around the new baby by using a toilet paper roll, paper towel roll, or even wrapping paper roll cut up. String yarn through it and hang it on your child's door. If the toy they want to bring out can fit through the roll... then it has to stay in the room. That way, little lego pieces and barbie shoes are not getting anywhere near your crawling baby.
Choke tube
Of course, you can always buy one, if you don't want to hang a toilet paper tube on your door!
And here is a great article about toy safety when you have some time.

And now back to Easter:
I found this cookie recipe on All Recipes.com and I really liked the idea of doing it the night before Easter with your children. I know my kids will be too young this year to really get it, but I am going to file this idea away for next year!


Easter Story Cookies

Ingredients:

  • 1 cup pecan halves
  • 1 teaspoon distilled white vinegar
  • 3 egg whites
  • 1 pinch salt
  • 1 cup white sugar
  •  

Directions

  1. Preheat oven to 300 degrees F (150 degrees C).
  2. Place pecans in a resealable plastic baggie. Crush the pecans into small bits. Read John 19:1-3
  3. Put 1 teaspoon vinegar into a medium bowl. Read John 19:28-30
  4. Add egg whites to the vinegar. Read John 10:10-11
  5. Sprinkle salt into the egg whites. Read Luke 23:27
  6. So far, the mixture isn't very appetizing. Add 1cup sugar. Read Psalm 34:8 and John 3:16. Beat with mixer on high speed for 12 to 15 minutes until stiff peaks are formed. Read Isaiah 1:18 and John 3:1-3.
  7. Fold in broken nuts. Drop by teaspoons onto parchment paper lined baking sheet. Read Matthew 27:57-60.
  8. Place cookies in the oven close the door and turn the oven off. Read Matthew 27:65-66.
  9. Go to bed. Read John 16:20 and 22.
  10. In the morning open the oven and take out the cookies. Read Matthew 28:1-9.

***If you go to the link above, all the reviews say to add 1 1/2 teaspoons vanilla in with the sugar.  But what a fun way to teach the meaning of Easter! And the tomb was....