





Friday, June 28, 2013

Guest Post: DIY Sensory Light Box

WARNING:  After reading this Guest Post you will be running to the Dollar Store.  Thank you for sharing Andrea!  ~Sarah
............

Hi everyone - I would like to introduce myself.  My name is Andrea Dawe and I met Sarah through a moms group in Calgary almost 2 years ago.  I am also a teacher-at-heart and now a stay-at-home mom to my two kids, aged 3 and 1.  I have just very recently started my own blog, which is mostly recipes from my kitchen (dairy and wheat-free), but I also plan to post about living a greener life and about fun and learning at home with my two kids.  Feel free to check out my blog My Kitchen Notes and Other Ramblings!

Anyways, here is my post on how to make your own sensory light box...

I thought I would share what I have been 'cooking' up the last couple days.  I am working on introducing sensory play to my kiddos (aged 3 and 11 months) at home.  I am in the process of getting organized and making a sensory bin table, but when I found the idea of a DIY light box online, I had to make one right away.  It was super easy, fairly inexpensive, as far as toys go, and will provides hours, hopefully years of fun and learning!  

Here is how I made ours:

I bought a clear tub from Walmart.  Mine is a Sterilite with handle snap sides.  As for size, really up to you.  I wouldn't go too deep for this, so the lights won't be too far down, but enough space you can still store some materials inside if you want.


I lined the inside with tin foil, using scotch tape, nothing fancy, just did it quickly.  This is to keep the light from escaping out the sides of the bin.  I saw the idea of tin foil online, you could probably use construction paper too.   Not sure if the tin foil helps to reflect the light.


I bought some LED push lights from Dollerama.  I have 6, and only enough batteries for 3 so far, but I may even add more to get full coverage of the top of the bin.


These lights came with self adhesive, so I stuck them to the bottom.  You just push the tops to turn them on and off.


I lined the lid with wax paper to make it translucent to help disperse the light.  Again, just a quicky job.


Tada!  Our light box!


The lights don't look like quite as strong as in this picture, they are a bit more subtle.


Here are some things I found mostly at Dollerama to play with on the light table.  I also picked up a Light Bright at a garage sale this weekend, but thought the little pegs would be un on this too.


I also bought some plastic binder dividers that are translucent too, which I am going to cut up ino all different shapes for exploring, learning, and making pictures with.  So far I cut out some squares and wrote the alphabet out on them so we can do some literacy with it too.  I plan to do a whole bunch of letters in both upper and lower case for word work later on.  I plan to do numbers too.  The possibilities are endless!  Taking learning into the dark is just fun!


Here is my daughter checking out the new stuff for her light box tonight.  She loved mixing he primary colours - her expression was priceless!  "I made purple!" 


I like having another bin beside the light box to hold materials in for her to explore with.  You can also use the lid of the extra box flipped upside down to better hold little items, like marbles and such, so they don't roll everywhere.  

I can't wait to see it with more lights.  I think she will enjoy using it in our cardboard house or in our nook under the stairs to get the dark/light contrast.  I just keep thinking of new things we can do with this thing!  Would make a great toy for a power outage or for camping!

I will also let my son use it, but that will require either more close supervision, since he is only 11 months and puts everything in his mouth, or more careful choice of what materials I put out with it.  

You can just give them materials to explore, do guided activities, or make things up as you go along.  So far it's been great for independent play, but she still enjoys to play together best.   It's so neat to watch how they play and learn and come up with things you wouldn't even have thought of!  

Notes:  Try to get a bin with a smooth top.  I didn't, but I may reverse my bin, because he bottom is vey smooth with a nice little ridge around it to keep materials on better.  When I get around to it, I will update.

Just google DIY sensory light box to find more inspiration!  Here are a few pages I took inspiration from:


Andrea

Monday, June 24, 2013

Summer science Thursdays!

I've done it!
Have you?
3 weeks down, and many more to go!!

Here are some pictures from our Thursday fun:

 Hydrating water beads (found mine at dollar tree, but also at hobby lobby)

Vinegar and baking soda balloon experiment

Shaving cream and corn starch

ps... I'm doing this from my phone because my Mac crashed... so I apologize for the lack of organization in this post!

Suzie

Sunday, June 2, 2013

Summer Science Fun

I am challenging myself to a realistic goal.
Not too ambitious that I succumb to that feeling that I bit off more than I can chew.
But one that I feel is actually attainable.


Once a week, on Thursdays, I am going to execute a fun, hands on, science activity.  This isn't home schooling. This isn't lesson planning. This is just do something fun and make some memories while learning!


Who wants to join me?!!

You are going to need to do some prep work. But really, just add what you need to your weekly grocery list.

Here are some ideas to get you started, and I will blog each week after our Science day and let you know how it went.

Messy Fun!
Materials: 1 box corn starch, 1 can shaving cream


Blow up a Balloon!
Materials: Baking soda, vinegar, balloon, funnel, spoon, empty bottle


Melting Ice!
Materials:  variety of bowls, droppers or syringes, food coloring or liquid water color, variety of salt (table, rock, sea salt, kosher)


Swamp Sensory Tub!
Materials:  Gelatin, sugar free kool-aid for color, large container, pool noodle, plastic swamp creatures, water and a large tub.  (Really... I am cheap and lazy, so I'm sure I will just throw in toys that I have around the house.)


Suzie

Thursday, May 23, 2013

Mud Pie Table


With the sun finally coming out in Canada, we have been spending our days outdoors!

Our backyard is super TINY but there is a corner of the flowerbed that is designated as Carter's Corner.  It's not elaborate, in fact, until last weekend it was bare.  Empty.  Full of dirt = perfection.

He'd sit back there for hours with a few trucks or "diggers" plowing away.

Or with this massive one! :)

Well we decided to take the dirt a step further this summer.

I bought this lovely IKEA table set at a garage sale last year for $35.  

I knew when I bought it that it would be painted ASAP.  I just didn't know that ASAP would be like a year and a half later.

It had run its course in the house and was sitting in the garage waiting for me to use it.

Low and behold...

The Mud Pie Table

I painted the top black with chalkboard paint.  (Because we had it.)
Then I sprayed the legs with copper spray paint. (Because I like it.)


Found two mixing bowls at the grocery store.

Pie Break!  Then....

Had Daddy cut out two holes.

Now the bowls are fit level with the table!  A perfect work space.

The two bowls can be used for any materials really!
Right now, we're using water and dirt.
I have visions of using wood scraps, wood glue and paint.

Now if the rain could go away today we'd have a happy boy.  Because we all know that a dirty boy is a happy boy!


Sunday, May 19, 2013

Alphabet Pancakes

Pancakes are a staple in our house.

I love them.  My children love them.  Canadians love them.  (It's true).

We make them bland with flax but vary it up with blueberries, raisins, chocolate chips, honey and now as letters and shapes.

I poured the batter into a Pour Bottle, like an old syrup bottle!  See, we eat lots of pancakes.

Now it's easy to make those letter and shapes!

"C" is for panCAKE!?


He asked for a 'B'.

Thought of a 'C' word.  Cot.

And one more...Car!

It was a simple way to bring letters and word building into our day!

Finally, the extra batter can be refrigerated and used the next day!

         Bon Appétit!

Friday, April 12, 2013

IKEA Hack: Creation Station

Ever since our visit at my neighbor's (neighbour's for all of you Canucks) for a birthday party I've been obsessed with their Creation Station in their main living area/kitchen area.  Literally, when I'm awoken for night time nursing sessions I have a hard time going back to sleep because I'm thinking about this table!  What is wrong with me?  But I want one!!

  First of all, these particular neighbors have really cool style!  They put a lot of thought into everything area of their home and make it livable for their entire family...even the youngest members.
Here is why it is so cool:

First, it has awesome storage using THIS unit from IKEA.  They've stocked it with art supplies and recyclables for what ever the imagination can create like, egg cartons, paper towel rolls, etc. 

Second, it is the perfect height so children can gather around and work, without sitting. Boy Moms, you know how that's not happening.  

Third, the top is a counter, used for a kitchen island (from IKEA), so it's totally wipeable, cut and finished...and inexpensive! 

LOVE!

Ahh...I want to do something like this so bad!  I think I'll have to do some de-cluttering first.

Do you have an Art Area or Creation Station you like or use?  
Put a link in the comments!  We want to see!


Monday, April 8, 2013

6 Sensory Table Ideas


     As parents and grandparents, we are always on the prowl for a safe activity that will engage our child either by himself or with a friend  that they can experience independently.   We want an activity that will not only allow them to be creative, but will also let them use their senses and develop their fine motor skills.  (The time will come too quickly where they will be asked to use a pencil and paper.)    One of my favorite and easiest forms of play is the sand and water table.  Now, there is no need to go out and purchase a sensory table but there are several reasonably priced ones at Walmart, Target and Toys R Us.  One of my favorite and easy sensory bin to store is a simple storage bin with a lid.  You can store the play material in the bin, take the lid off and “dwella”  it’s playtime.  You can also have several bins ready to go with different material stacked in your garage for a beautiful day outside or a fun activity on a rainy day on your porch or kitchen table.  LET THE FUN BEGIN!!!!!


                  Water with/without bubbles is always a favorite.  This one just happens to have plastic butterflies hiding in the bubbles just waiting to be scooped up with nets or little fingers.  Note:  The fine motor development with the scooping and picking up the slippery butterflies with fingers.


                  Here is a fun and easy activity.  It is a large block of ice which was frozen in a pan with small plastic toys, sparkly gems and sequins.  You put the frozen block of ice in the tub and give the children different tools to try to remove them.  This little girl had a small rolling pin.  You can also supply small rubber mallets with golf tees,  eye droppers with warm water to help melt the ice, spoons, etc.  Use your imagination.  This is fun to do on a hot day outside as well as an activity to keep little hands busy while Mom cooks dinner.  They love it!   More fine motor development! 


                  Here is a bin of dried corn feed.  You can also use dried beans of all types for a clean, easy bin of play.  We have added forms of transportation  to this table but simple spoons, laundry scoops, plastic cups of assorted sizes are just as entertaining and the learning is just as valuable. 


                  Sand and cornmeal is always a favorite.  Sifting, measuring, weighing, scooping and transferring are math, science and fine motor skills all rolled in one fun activity.   Add some coffee beans for the aroma and texture along with assorted sizes of scoops, spoons, cups, scales, etc. and let them go!!!!!


                  Below is a bin of potting soil with worms.  UGH!!!!  No worries, these are small rubber worms.  Gardening spades, shovels, small cups, tongs, cups and buckets are added for the experience.


                  Last but not least is clean snow dough.  This sweet smelling dough not only is delightful to smell but to touch.  You can make it as follows:
  • One small bottle of baby oil
  • One 5 lb. sack of flour
  • Mix together and pour into your bin. 

                  These are just a few fun, independent learning activities you can provide for your children. 
ENJOY and make memories!

Friday, April 5, 2013

Think Outside the Box: Car Wash

Thank you Cost Co for your boxes.  Sometimes they are a pain, but other times, they are magical.


Carter was using the plain box as a carwash and over the course of a week...it evolved.


Inside shot.  She the mini-koosh balls?
They are the scrubbers.


"Mom, big twucks go in dis side.  And wittle twucks go in dat side."


See the plastic hanging?  It's a door.

I love seeing all fun that can come from a box.  The time creating is so imaginative, inventive and inspiring. The time playing with the new creation is just a bonus!


Tuesday, November 20, 2012

Thanks & Giving


With Thanksgiving coming in a few days and Christmas just around the corner, nostalgia has set in.  I think about all the holidays our family has celebrated in the past.  The all included the 4 F’s, Family, Food, Fun and Fellowship.  We have truly been blessed through the years. 

With this being said, there are many people out there who have not been as fortunate as you and I have been.  Simple basics such as food, shelter and clothing do not belong to everyone.  There are a lot of needy individuals on the street and in shelters.  All of these people are not non-working “takers”.  Many of them have had one misfortune after another only to find themselves in trouble and needing assistance.

As a mother, grandmother and early childhood educator, I feel it is our duty to help others and to be examples to our children.  Children are basically ego-centric and need encouragement to think about others.  Through our example, we can make a difference in our world today which will be carried out in our world of the future. 

Here are few ideas to get you started on making a difference in our lives, our children’s lives and the lives of people we may not know.
  • Pack a peanut butter sandwich each morning and hand it to a person on the corner who may be hungry.
  • Empty your change in the jar of a needy person.
  • Give to Salvation Army at Christmas time.
  • Go to the Dollar Store and stock up on gloves, scarves and hats and drop them at your church, shelter, Interfaith, etc. 
  • Purchase a newspaper on the street corner even if you already have one.
  • Pack a bag of canned goods and donate them to a food pantry or give them to a person who may be on a street corner.
  • Pay it forward by leaving your change to be applied to the person behind you at the drive through.
  • Adopt a family or a child at Christmas and let your children go shopping and wrap the presents with you.
  • Donate Girl Scout cookies to the soldiers.
  • Donate books or toys to a homeless shelter.
  • Pass a smile to someone in the grocery store.
  • Let someone else in line in front of you at the mall or grocery store check out.

These are just a few things we can do to make a difference.  It is not about money, it is about hope.   I’m sure that many of you have other suggestions and we welcome your ideas.  Please leave a comment with your own ideas.

Just think, if we each did something small every day to help someone else while our children witnessed it.  This could spark thier interest to serve others as well.  And what a different world it would be.  WE CAN MAKE A DIFFERENCE!  

 Remember, Thanksgiving is about Thanks and Giving.   

Let your light shine and enjoy the season!

Sunday, November 11, 2012

Gobble Gobble

Family Fun night at our house tonight!


I used cardstock to paint the hands. 
I let the boys tell me what color to paint each finger.
And Luke painted Daddy's hand!

Then add legs, eyes and cut out!

I added names under each hand and the year.

I found a frame 50% off at Hobby Lobby that was made to hold 3 pictures with a matte.
 I took out the matte. Covered the back in burlap, and attached my turkeys.

Viola.  Instant Thanksgiving Decoration!

However, how great would this be to do with the Grandparents at Thanksgiving too!
That way you can always have their 'Turkey' for years to come!

-Suzie

Sunday, July 29, 2012

Dry Erase Crayons... a new must have!

Okay, can you dust off the cobwebs?!!!
It seriously has been forever since I have posted on here! 


Let me fill you in on my life in a super quick way: 
Found out my husband was going to be transferred in February. Two weeks later our house went on the market. Four weeks later we were under contract. 4 weeks after that, we were under contract on the new house...and bam, we relocated 245 miles north.
So basically, I felt like I had nothing to blog about. All I would do was organize my house, clean my house, clean it again, and then pack.


However, last week I went to my favorite/least favorite place to shop: 
Wal-Mart for a nap mat. 
And the teacher in me could not pass up all the school supplies. I snagged some random stuff which I think I will start blogging more about later.


(Here is the nap mat tutorial I am going to follow. I mean, $100 bucks on etsy is just way too much for me. I spent $12 each on fabric, and $13 for the mat. So, two washable nap mats for less than $50.)


But today, we played around with these:


Here is an easy easy activity:
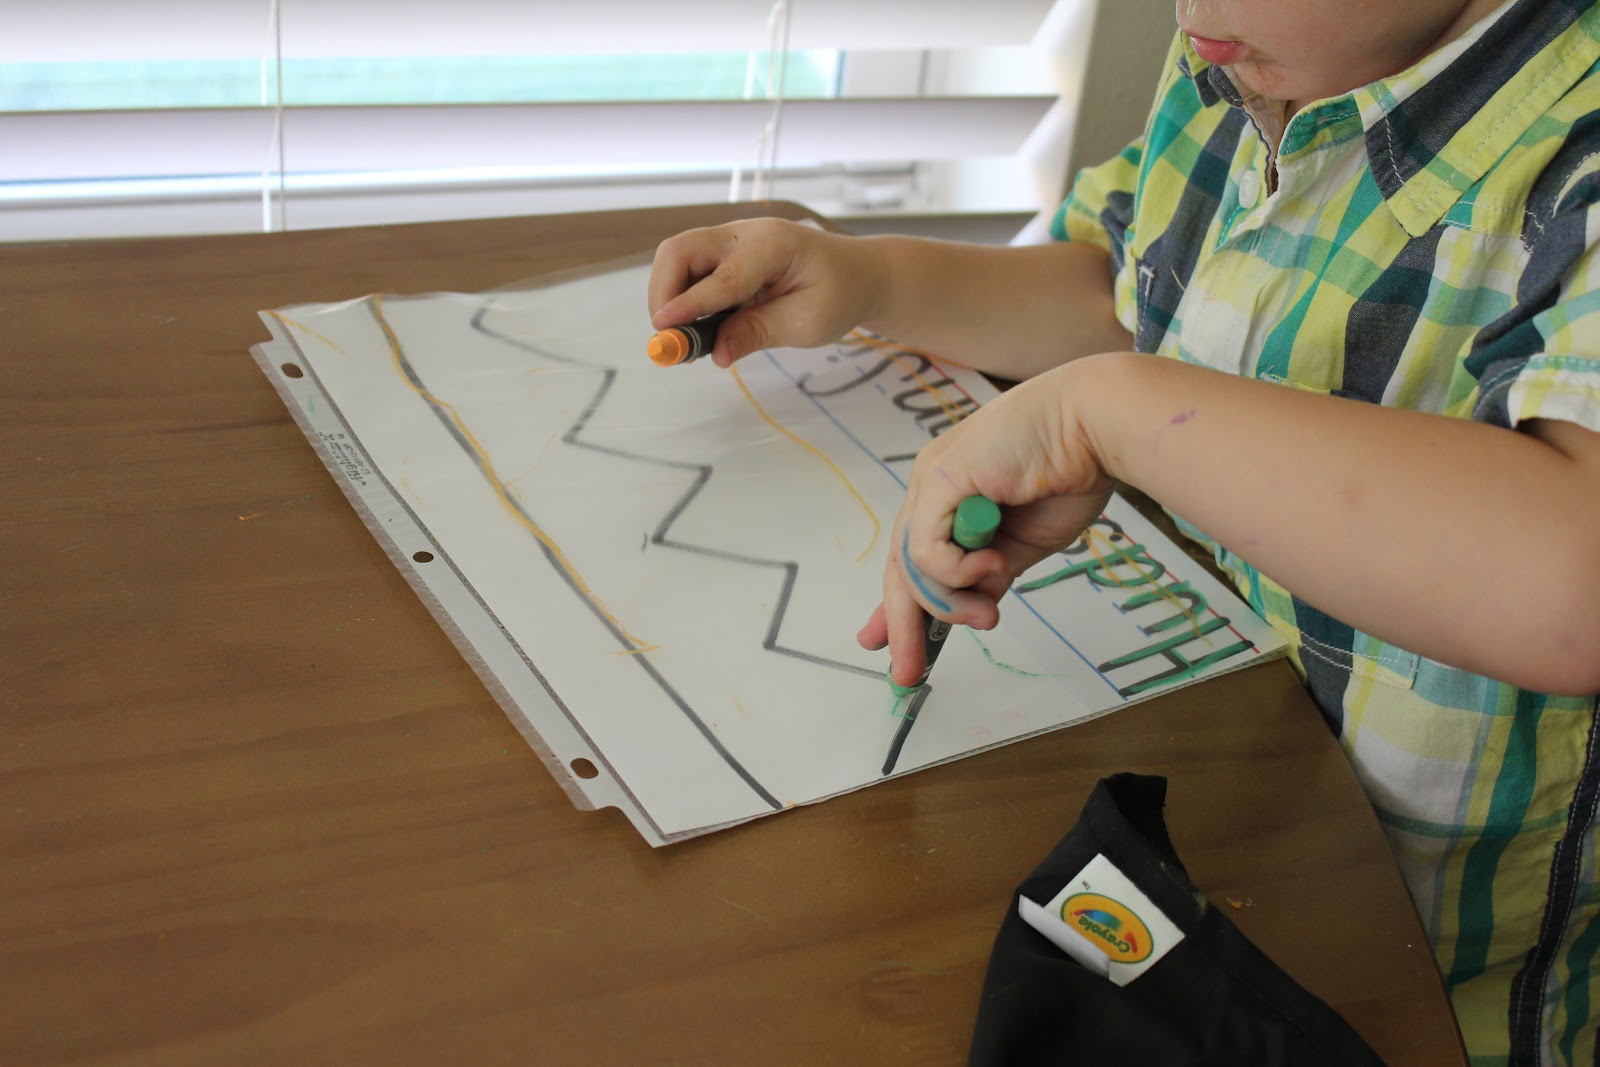
Grab a plastic sheet proctor.
A sheet of paper.
And a marker.
Draw anything you want them to try to trace and slide it inside the sheet protector!
 Instant dry erase board!
For example:
2-3 year olds: straight lines, zig zag lines, shapes, single letters (like A a )
4-6: Full name (remember, we don't write or read in all caps, so you don't either.)
Site words, alphabet, numbers, a non stick person
6-and up: spelling words (tracing over spelling words 3x is a proven technique to use with children with dyslexia.), art

Hudson: don't mind his grip, we are working on that too!
 He is working so hard trying to stay on the straight black line!
 See that black rag? The box comes with this neat mitt type eraser. Hudson loved that too.

My guys aren't even three yet, but they focused on this task for about 10 minutes. 
I was over zealous putting their whole name on a sentence strip. But hey, they need to be able to 'read' it and recognize and pick out letters. So still a teachable moment.

Speaking of sentence strips, they were also at Walmart on an end-cap. (When using them, make sure the red line is at the bottom. And please for me, Uppercase letters followed by lowercase. Can you tell it is my pet peeve!!!?)


I hope to be around more often! So check back!

Suzie
 

© 2011. All Rights Reserved. | Custom Blog Design By Penny Lane Designs