





Showing posts with label Fine Motor. Show all posts

Sunday, July 29, 2012

Dry Erase Crayons... a new must have!

Okay, can you dust off the cobwebs?!!!
It seriously has been forever since I have posted on here! 


Let me fill you in on my life in a super quick way: 
Found out my husband was going to be transferred in February. Two weeks later our house went on the market. Four weeks later we were under contract. 4 weeks after that, we were under contract on the new house...and bam, we relocated 245 miles north.
So basically, I felt like I had nothing to blog about. All I would do was organize my house, clean my house, clean it again, and then pack.


However, last week I went to my favorite/least favorite place to shop: 
Wal-Mart for a nap mat. 
And the teacher in me could not pass up all the school supplies. I snagged some random stuff which I think I will start blogging more about later.


(Here is the nap mat tutorial I am going to follow. I mean, $100 bucks on etsy is just way too much for me. I spent $12 each on fabric, and $13 for the mat. So, two washable nap mats for less than $50.)


But today, we played around with these:


Here is an easy easy activity:
Grab a plastic sheet proctor.
A sheet of paper.
And a marker.
Draw anything you want them to try to trace and slide it inside the sheet protector!
 Instant dry erase board!
For example:
2-3 year olds: straight lines, zig zag lines, shapes, single letters (like A a )
4-6: Full name (remember, we don't write or read in all caps, so you don't either.)
Site words, alphabet, numbers, a non stick person
6-and up: spelling words (tracing over spelling words 3x is a proven technique to use with children with dyslexia.), art

Hudson: don't mind his grip, we are working on that too!
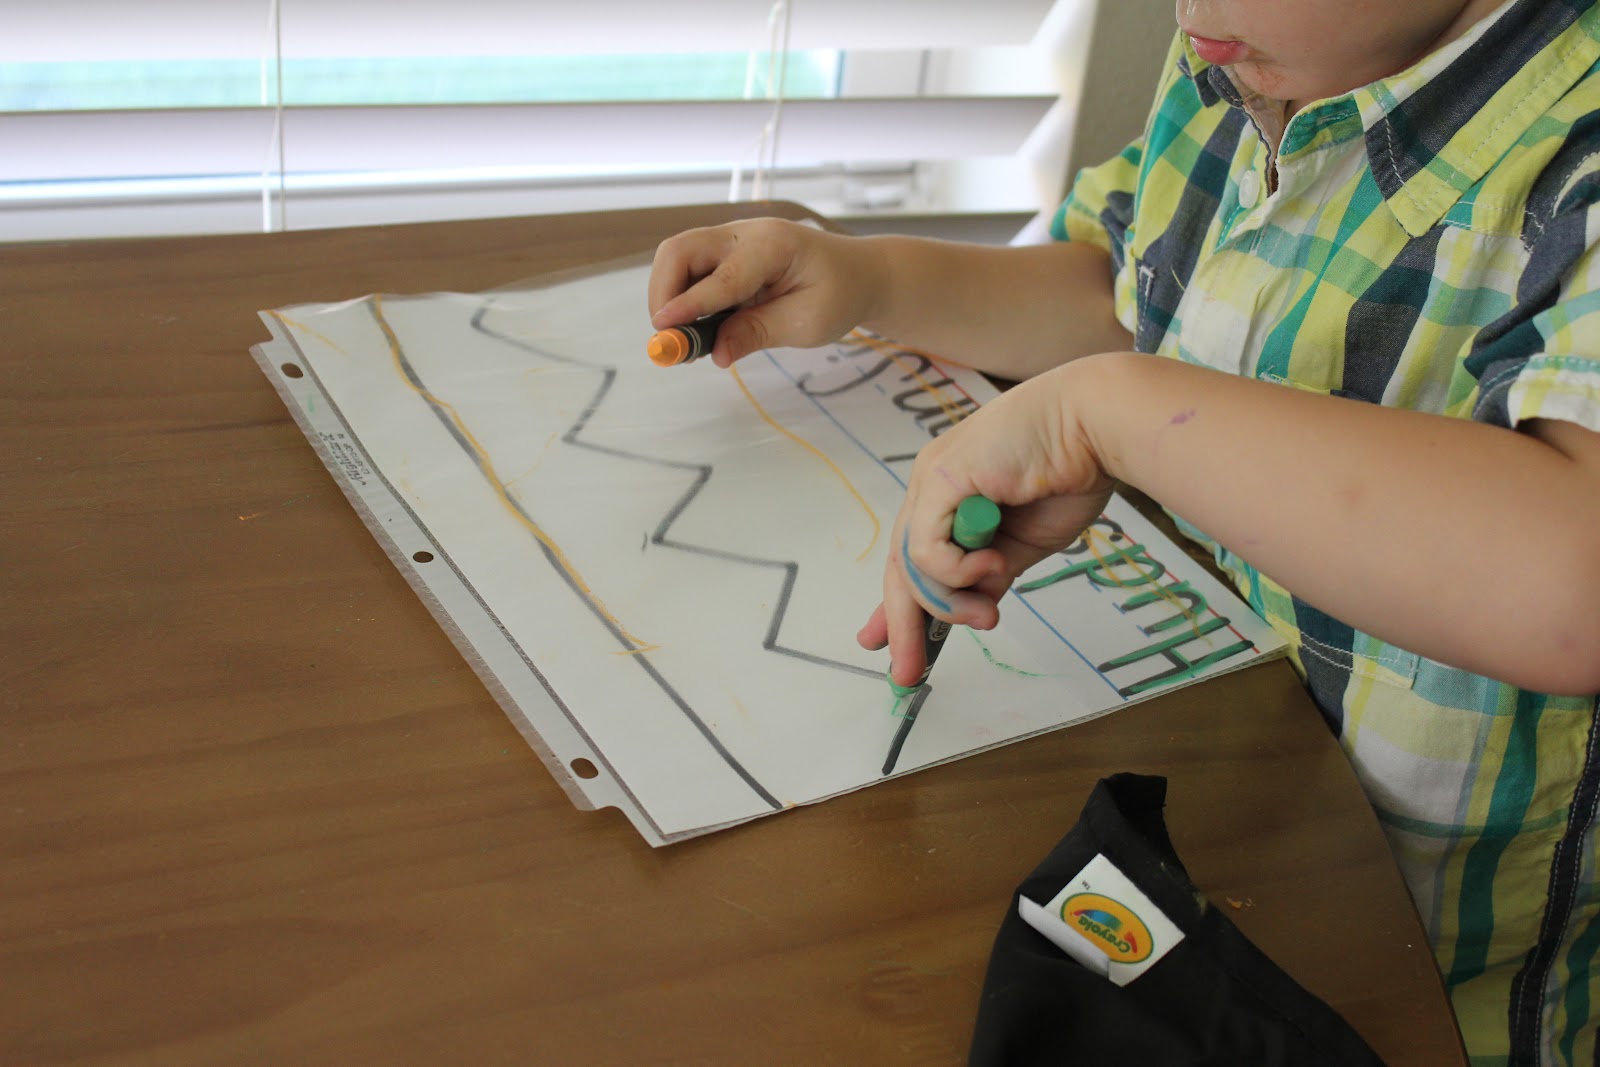
 He is working so hard trying to stay on the straight black line!
 See that black rag? The box comes with this neat mitt type eraser. Hudson loved that too.

My guys aren't even three yet, but they focused on this task for about 10 minutes. 
I was over zealous putting their whole name on a sentence strip. But hey, they need to be able to 'read' it and recognize and pick out letters. So still a teachable moment.

Speaking of sentence strips, they were also at Walmart on an end-cap. (When using them, make sure the red line is at the bottom. And please for me, Uppercase letters followed by lowercase. Can you tell it is my pet peeve!!!?)


I hope to be around more often! So check back!

Suzie

Wednesday, April 18, 2012

Beans and Pasta Shapes

A meaningful activity never has to be a big, fancy, deal.

In fact, at this age, lessons are so short and simple, that they are constantly happening.  Even when you aren't meaning too!  Which is why we should be thoughtful about our time and interactions with our little ones.  They are ALWAYS learning from you!  Scary!

I've been so bad about snapping pictures, blogging really.  But today I managed to snap a few of our post-breakfast fun!  

We read:

as a little introduction to our activity.

Then I grabbed:
  • index cards
  • pasta and beans (stolen from our sensory table)
  • glue
  • marker
I drew a circle, triangle and square then labeled it at the bottom.  As I drew, I talked about the shape and letters I was writing.


He chose to start with the circle.

I glued on the drawing and let him get busy with the pasta and beans!

We talked about the shapes, how many sides they had, and real life objects that are those shapes.

Did he finish all 3?  No.
Did he finish 1?  No.

That is how he rolls.

All of 5 minutes later, we hung them on our magnet board.  Glue dripping and all.

The most important part of crafty looking, glue, paint-ishy projects is the PROCESS, 
not the end product.

We had a good 5 minutes talking about these shapes, all while doing a little fine motor work!  That is what the process was about!


Monday, November 21, 2011

Thanksgiving Centerpieces {Pumpkin Decorating}

Do you still have pumpkins or gourds laying around?

Let your kiddo in on some process art!  Maybe even create a little centerpiece for Thanksgiving!

I admit, what I'm about to show you is about a month old.  Carter and I made these the night before we flew to Texas.  I didn't want to leave Daddy without pumpkins to put out for Halloween.  But here we are long after and I'm just now putting them on the computer.  They were just going to be passed up and stuck in this thing forever so as a last resort I thought, maybe you can adjust these ideas a bit for a Thanksgiving decor! 

So on the blog they go.


Button a Pumpkin.

Doesn't get much easier than this!

1. Glue
2. Tons of Dollar Store buttons


Carter was having so much fun, we had to "button the back!"


 Tape Resistant Art!

My cousin (shout out to Lauren!) shared this idea with me!  And it was a blast!

Carter's painting attention span lasts about :45 seconds per color.  Ha!  So this was a perfect activity for him.

Using Painter's Tape, cut the shape onto the pumpkin.

For Thanksgiving I'm thinking, maybe trying to cut a turkey, leaves, simple polka dots, or stripes.  What are your ideas?


Paint away!

MOM!  I need a napkin!!

Almost done!

Pull the tape off!  Tada!!

Note:  We used Crayola Finger Paints.  Not the best for painting a pumpkin.  It flakes off.  Would it last a day or two?  Yes.  

(And Carter 21 months)

Thursday, November 10, 2011

Fine Motor with Feathers

This is a straight up steal from Ms. Tracee at ELP this morning! But it was too good not to share!

A colander, a bag of feathers and a toddler!
He was so excited!

Suzie

Wednesday, October 19, 2011

Sticker-ing a Pumpkin: Fine Motor Work


Source: curbly.com via Sarah on Pinterest
I pinned the above picture because it was cute.

No other/educational reason really!  Simply cute and I love that!!

The above blogger used star sequins and tacky glued them to the pumpkins for a Crafty Girls Night Out!  (She also made an amazing sequined drip pumpkin!  You have to check it out!)

Her picture reminded me of those little star stickers and I thought, what a fun Fine Motor Activity!


So we pulled out the sticker stars and stickered away!

(Iphone picture.  Sorry.)
Carter's chubby fingers hard at work!
*Notice the crumbled sticker sheet laying next to the pumpkin.  We had a mini-meltdown.


Fancy, fancy!! 

;)

Peeling those stickers is hard work!!  They were tiny and a bit challenging as the paper would pull up along with the sticker....which caused the meltdown.  Bigger stickers would have been a bit better for him.

Confession:  I totally tried to encourage to push him to pick the silver or gold stars but he wanted the blue.  Bad Mommy!!!


(And Carter 21 Months)


Thursday, October 6, 2011

Lacing Bucket

Fine Motor work is so important, just think of all you do with those little hand muscles!

If you really need a reason....Pre-Writing skills!  You're little baby needs strong muscles to start writing all of those college essays!  ;o)  Plus, it's fabulous developmentally appropriate fun!

This Lacing Bucket is homemade...
I know, I know, it looks like a Melissa & Doug toy.  (NOT.)


Materials needed:
1. Coffee tub, with cardboard sides, not the metal sides.  
2. Thin rope.  I found mine at the Dollar Store.  
I like this better than yarn because it is stiffer and easier for his little hands.  
If you DO use yarn, tape up the ends to make it stiff!!

How to make it?
1. Spray paint the tub...optional.
2. Make holes in it.  
I stabbed it with a screwdriver...I was too lazy to find the screws.
3. Cut the rope into different lengths.


Threading is tough!! 

Show them how and let them at it!


I was expecting and ready for some frustrated melt downs! But pleasantly surprise.

If they do seem a bit frustrated, help them out.  
If a meltdown occurs, try again another day.
They may not be ready for the job and they are letting you know!

When all done, put the ropes in the tub, and lid back on!  It stores nicely!

~Sarah  (Carter 20 months)

Monday, June 20, 2011

Take and Put Work {A Guest Post}

Courtney is a friend of mine (Sarah) from my days at Texas A&M, where we were Chi Omegas together! She is also a teacher turned Stay-at-Home mom to her adorable 9-month old son, Jay! She writes a wonderful witty blog about her days with Jay, who is growing up way too fast! Her little guy is getting to such a fun age and is learning like crazy! (He is talking a TON, by the way! WOW!!) Take a look at this post she originally posted on her blog about some skill building you can do with your babes at this age!

.....................................

One of my favorite years of teaching was when I worked in a Montessori School in Houston for a year. This was one of the BEST learning years EVER!

Montessori schools have an incredible method- the children learn at different paces as they are ready. It teaches incredible (but VERY soft, loving) discipline, sets high academic expectations, and allows the children to be taught at their own pace- not at the teacher's!

While I don't agree with every single Montessori practice (I don't usually agree with every single practice from ANYthing), there are a LOT of wonderful things about Montessori schools. I think so highly of them that our plan is to put Jay in one for preschool before he attends public school.

Anyway, one of the simplest "jobs" in a Montessori classroom is Take and Put. The child learns to take something from one container and put it in another. As the child becomes more advanced, so does the job. Items get harder, you use tongs or other utensils to practice more fine motor, etc...

So we set up a little Take and Put workstation for Jay at my parents' house on their kitchen floor with containers and cheerios. He seriously sat and did this for FIFTEEN minutes! My child has NEVER sat and done ANYTHING for fifteen minutes. This is an on the go kid. I was shocked at how long he was able to focus on this task. And how much he loved it!

Here is a minute long video showing how SIMPLE this is- and for you stay at home mommies that need an activity with your baby- here you go!


............................

Thanks for sharing this wonderful post with us!! I can't wait to learn more from you!!

Sunday, June 12, 2011

Oatmeal Play Dough {Guest Post}

I'm guest posting about Homemade Oatmeal Play Dough,


at Mama Pea Pod today!!


Stop by and check it out!


Monday, May 30, 2011

A Look Back

I'm currently working on the next article in the Brain Development series. I'm very excited to announce that the next part will be published on I Can Teach My Child! I will give you all of the details once they are set, but it should be at the end of this week. I hope you can show us some lovin on her uber big blog! (Eeek...I'm getting major stage fright.)

In the mean time, we've had so many new followers join us recently! Welcome, we are so glad to have you! I hope you can take a look around and check out the About Page to get a better idea of who we are.

Here is a look back at some old posts that have been lost in the dust but can hopefully inspire some ideas for Baby Play!!


Whew, those boys have grown!

OH, and happy Memorial Day. Can you tell I live in China?

Friday, May 27, 2011

5 Activities, One Great Day {Back Yard Fun Part 2}

YEA! It’s Summer time!

(At least it is for our school!! You?)

.....

Creating a whole Outdoor Classroom Playroom is my favorite ways to spend some family fun during summer. I hope you picked up the items from the previous post! Let's prepare our Playroom and get started!

First Things First:

  • After a hearty, healthy breakfast, dress everyone in a swimsuit, t shirt and water safe shoes every day. APPLY SUNSCREEN before you go outside, after lunch and then later in the afternoon. Make this a daily routine and keep a bottle of sunscreen outside to help cut down on the inside/outside traffic.
  • If you have a pool in your backyard, be sure to have it fenced off and be present to supervise play.
  • Fill a cooler with ice water and have a labeled plastic cup for everyone.
  • Bring out the tub suggested in the last blog post and LET THE FUN BEGIN!

These Five Simple Activities make for One Fun Day:

1. Paint the Fence: Give each child a bucket with water and a large paint brush and ask them to paint the fence, brick or patio.

The water will make the material appear darker when wet. (Magic?) The large arm motions of up and down and left to right will help develop the shoulder muscles, upper arms and wrists which are so needed for writing in later years. It will also encourage eye/ hand coordination.

2. Shaving Cream Play: Next, squirt a handful of shaving cream at a time and let the children paint it on the fence or house or walkway with paint brushes or fingers.

Be ready, they love to paint each other with shaving cream, as well. Mmmmmm… Mmmmmm smells great! Now, think about the senses being stimulated. Smell, touch, sight, even the sound of the squirting. I wouldn’t try to taste though. YUCK!

3. Shaving Cream Balloons: String a line of yarn at your child’s waist height. Then blow up about 5 to 6 balloons and tie them to the yarn so that they hang down next to each other. Let your child smear shaving cream all over the balloons and then give them the squirt bottle of water and have them wash the balloons clean.

They will enjoy this activity and will ask to repeat it over and over again!

4. Sidewalk Chalk: Sidewalk chalk has been around for many years. Hours of creative art on the fence or patio are great developers of fine and large motor skills. It is easily washed away for a new canvas on another day.

ENJOY! We all have budding artists in our home.

5. Rainbow paint: Hang a white sheet over the fence or between trees and give children spray bottles with washable liquid water colors. Let them spray the sheet with the water colors. (You can even take the inside of a washable marker and stick it into the water bottle.)

They will enjoy the activity and the outcome. This activity not only develops their fine motor skills with the squeezing of the squirt bottle but also their creativity. They will also be able to see the effects of blending colors and making others. The best part is that a little bleach in the washing machine will make the same sheet into a whole new, fresh canvas for the next day.

ENJOY and make memories! More Fun to follow…..


P.S. If you've tried out these activities or a variation, let us know, we love to link to you in this post!

AND

If you have ANY outdoor fun activities...link up below!!


Wednesday, May 25, 2011

Rice, Rice, Baby

When you live in China, rice is the easiest thing to come by!

I've been putting it off until C wasn't as obsessed with putting everything in his mouth. Don't get me wrong, some pieces made it in there. :{


He enjoys sticking ANYTHING that is in our table into the holes on the corners.


He was happy with this for about 5 whole minutes.


Then we had to spice things up with beach toys and dinosaurs! And another 5 minutes, we had!


I dyed a bit of rice last night while he slept using the same way-too-easy recipe as the pasta.

This is what is waiting for him when he wakes up!!

Lesson Learned: Us a tarp under the rice bin. Bow Tie Pasta was easy to pick up rice...not so much.

Tuesday, May 10, 2011

Outdoor Stations

With the sun a shinin' and temperature a risin'...we've been lovin' the balcony.

We don't have a big, green backyard but that doesn't stop Carter from banging on the back doors each morning, ready to start his day outside!

He loves it out there!

So, with a few little (very simple) stations set up outside, now there is actually fun outside rather than him just coming in and out, in and out.

First, we freshened up the pasta station with a little color!

Here's the recipe:

A few handfuls of dry pasta (up to your heart's desire).
About 2-3 table spoons of vinegar.
A couple of drops of food coloring.

Throw all of the above a zip lock baggie. (One bag per color.)
SHAKE IT UP!
Let it sit for about 30-60 minutes.
Lay them out to dry.
Voila!


Next, Window Art!

Washable Markers + Window = Masterpiece!

Don't you see all of those animals he drew? ;)

He also LOVES to wipe it clean with a Baby Wipe. And then has to show me, and I have to say... "Wow, look at all of the colors!"

Okay, seriously, remember when he couldn't get a clothes pin into the baby wipe container? This is what developing fine-motor skills means!

He is getting the marker lid onto the marker!
(I'm a nerd...this seriously makes me excited when I catch these little things!)

Oh and just so you know and aren't deceived by that picture, about 2-4 markers are destroyed each day we do this. So, buy the super cheap ones.

And a splash pool! Think: Big Water Table.

Sometimes this is cool.
Sometimes he plays from the side of the pool.
Sometimes he gets into the pool.
Sometimes it's just not cool...like today.

But there is evidence he was in and out of the pool, just last night.
See all of that lovely dirt on the yellow mat?
Nice.

Whoops, I forgot a picture of bubbles! We've been doing lots of bubbles. BUT chances are, you've seen bubbles and probably done them before! ;)

Linked up at We Play.
 

© 2011. All Rights Reserved. | Custom Blog Design By Penny Lane Designs